Leave Your Message

Italian Home Appliance Manufacturer: Quick Installation Guide for Three-Axis Servo Robots in Injection Molding Machines
Italian Home Appliance Manufacturer: Quick Installation Guide for Three-Axis Servo Robots in Injection Molding Machines
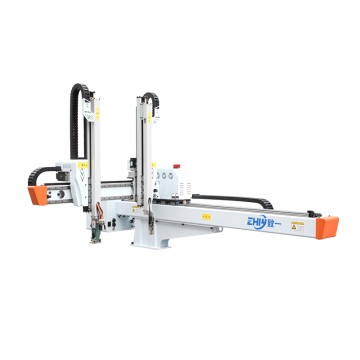
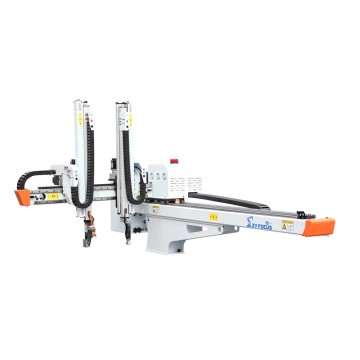
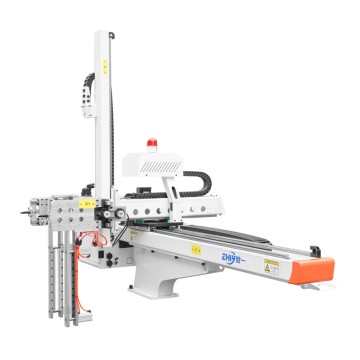
In the Italian home appliance manufacturing sector, automation upgrades in the injection molding process have become a core measure to improve production efficiency and ensure product precision. As a core component of injection molding machines, the rapid and standardized installation of three-axis servo robots directly determines the production line's efficiency and long-term operational stability. ZHIYI's three-axis servo robots, boasting a high load capacity of 50kg and ISO9001 and CE dual certifications, are suitable for the injection molding material handling and transportation needs of various plastic parts in Italian home appliance factories. This article, based on the actual working conditions of home appliance injection molding production lines, outlines a quick installation process for three-axis servo robots that conforms to Italian industrial standards, balancing installation efficiency and operational safety to help home appliance factories quickly implement automated production lines.
I. Pre-Installation Preparation: Adhering to Italian Home Appliance Factory Production Line Specifications and Conducting Pre-Installation Verification
Standardized pre-installation preparation is the foundation for rapid installation. It is necessary to strictly follow the EU EN ISO 10218-1 industrial Robot Safety standard, while also matching the layout characteristics of the Italian home appliance injection molding production line. The focus should be on completing three core steps: equipment verification, site planning, and tool preparation to avoid rework during installation.
Equipment and Accessory Integrity Verification: Upon unpacking, inspect the ZHIYI three-axis servo Robot Body (including arm, servo motor, and controller), connecting cables, mounting brackets, pneumatic components, and other accessories to ensure they are complete. Verify the product nameplate and CE certification mark. Confirm that the robot model (e.g., WKG-1000) matches the injection molding machine tonnage and the size of the appliance injection mold. Pay particular attention to whether the robot's gripping mechanism is suitable for handling plastic parts for appliances (e.g., casings, knobs, brackets).
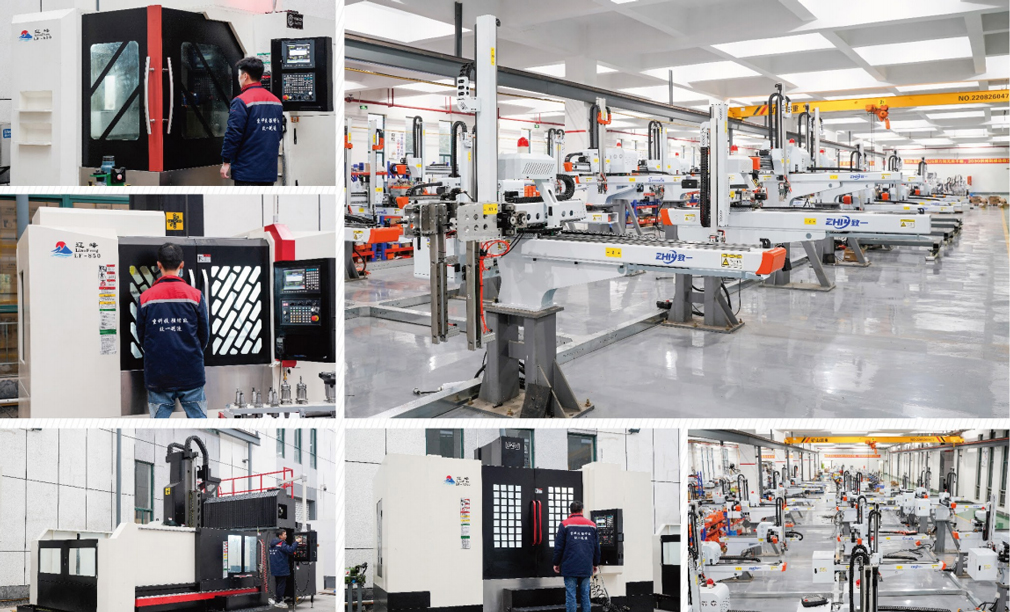
Production Line Site and Layout Planning: Based on the safety operating procedures of the Italian appliance factory's production line, plan the robot's installation location. Ensure the robot's range of motion does not interfere with the injection molding machine's safety door opening and closing. Maintain consistent installation direction for robots on adjacent injection molding machines, and allow sufficient space for equipment maintenance and mold replacement. Simultaneously, confirm the flatness of the mounting surface; use a level to check the error ≤0.01mm/100mm. For heavy-duty installations (e.g., gripping large appliance casings), reinforce the mounting surface.
Preparation of Specialized Tools and Auxiliary Materials
Prepare torque wrenches, levels, dial indicators, anhydrous ethanol, stainless steel gaskets (0.01mm/0.02mm/0.05mm), and specialized grease, etc.; pre-test the air and power sources, ensuring the air pressure is stable at 0.4-0.6MPa, the power voltage meets the robot's rated requirements, and proper grounding protection is in place to meet EU electrical safety standards.
II. Core Installation Steps: 6 Steps for Rapid Assembly, Adapted to Home Appliance Injection Molding Production Line Conditions
The ZHIYI three-axis servo robot features a modular assembly structure designed for the injection molding industry. Combined with the fast-paced production needs of Italian home appliance factories, the core installation process is simplified to 6 key steps, allowing for rapid single-person operation. Initial debugging can be performed immediately after installation, significantly reducing production line downtime.
Step 1: Secure the Robotic Arm Base to Ensure Installation Stability
Place the robotic arm base in the preset installation position and secure the bolts using a diagonal, step-by-step tightening method: first, pre-tighten all bolts to 50% of the rated torque, then tighten them diagonally to 70%, and finally fully tighten to the rated torque. This prevents uneven stress on the base from causing deformation. If there are slight deviations in the mounting surface, adjust the base's level using stainless steel shims to ensure the robotic arm operates without wobbling during three-axis operation, meeting the high-precision material handling requirements of home appliance parts.
Step 2: Assemble the Three-Axis Arm to Precisely Match Transmission Accuracy
Assemble the X/Y/Z three-axis arm sequentially, focusing on checking the fit accuracy between the ball screw and the guide rail. Before installation, wipe the contact surfaces of the ball screw and guide rail with anhydrous ethanol to remove oil and metal debris, preventing wear during operation. After assembly, manually move the arm to check for even resistance and no jamming, ensuring the three-axis transmission clearance meets standards and guaranteeing the positioning accuracy of the robotic arm when grasping home appliance parts.
Step 3: Power and Pneumatic System Connection, Complying with EU Safety Standards
Connect the cables between the robot's servo motor and the controller, ensuring cable protection to prevent contact with moving parts; connect the pneumatic system (including suction cups, grippers, and other grasping mechanisms), checking the air pipe connections for leaks; connect the robot to the injection molding machine for signal interlocking, focusing on core signals such as mold opening, mold locking, and ejection, ensuring interlocking between the robot and the injection molding machine, complying with the safety interlocking requirements of EN ISO 10218-1.
Step 4: Controller Installation and Debugging, Adapting to Home Appliance Production Line Programming Requirements
Install the robot controller in an easily accessible location, connect the power and data cables, and perform a home return operation after starting the controller, allowing the robot's three axes to return to their initial positions; based on the process requirements of home appliance injection molding, initially set the robot's operating speed, gripping position, and unloading position, etc. The ZHIYI robot controller supports visual programming and can be directly adapted to the production line process adjustment requirements of Italian home appliance factories.
Step 5: Adapt the Gripping Mechanism to Match the Characteristics of Home Appliance Plastic Parts
Based on the type of injection-molded home appliance parts (e.g., thin-walled shells, rigid brackets, small knobs), replace the gripping mechanism with the corresponding one: use a vacuum suction cup for thin-walled parts and a pneumatic gripper for rigid parts, ensuring moderate gripping force to avoid damaging the parts; adjust the angle and position of the gripping mechanism to accurately align it with the mold cavity, ensuring material handling efficiency and stability.
Step 6: Pre-Integration Inspection to Eliminate Installation Hazards
After installation, conduct a comprehensive inspection of the entire machine: check the tightness of all bolts, the secure connection of cables and air pipes, and whether the three-axis arm's operating range interferes with other equipment on the production line; reconfirm the air source pressure (0.4-0.6MPa) and power grounding are normal, ensuring there are no safety hazards before proceeding to the integration inspection stage.
III. Overall Machine Integration and Calibration: Adapting to Home Appliance Injection Molding Processes to Ensure Operational Accuracy
Integration and calibration is a crucial step before the robotic arm is put into use. It requires consideration of the injection molding process characteristics of Italian home appliance manufacturers, focusing on motion calibration, accuracy adjustment, and interlock testing to ensure the robotic arm and injection molding machine operate in synergy, meeting the continuous production needs of home appliance components.
Three-Axis Motion Calibration: Start the robotic arm and adjust the operating speed and acceleration of the X/Y/Z axes. Based on the molding cycle of home appliance injection molding, optimize the robotic arm's material picking, handling, and unloading movements to avoid excessively fast movements that could cause parts to fall, or excessively slow movements that could affect production line efficiency. Ensure the robotic arm can quickly and accurately pick up materials after mold opening and unload them to the designated conveyor position without jamming or deviation.
Positioning Accuracy Adjustment: A dial indicator is used to test the positioning accuracy of the robotic arm after gripping the parts. The error is controlled within 0.1mm, meeting the high-precision assembly requirements of home appliance parts. If accuracy deviations exist, they are corrected by adjusting controller parameters or ball screw preload. The ZHIYI three-axis robotic arm supports micro-fine adjustment and can adapt to the injection molding processes of different home appliance parts.
Injection Molding Machine and Robotic Arm Interlock Test: A linkage test is conducted to verify the interlock function between the robotic arm and the injection molding machine: In case of robotic arm malfunction, the injection molding machine immediately stops running; when the injection molding machine stops (e.g., for mold replacement or equipment maintenance), the robotic arm can be manually returned to a safe position without affecting mold replacement or equipment maintenance; the emergency stop function is also tested to ensure that the robotic arm can stop immediately in emergencies, complying with EU industrial safety standards.
IV. Post-Installation Acceptance and Rapid Production: Establishing Standardized Acceptance Standards to Shorten the Production Cycle
To meet the rapid production needs of the Italian home appliance factory, standardized acceptance standards tailored to actual working conditions were established. Acceptance was conducted from three dimensions: operational stability, process adaptability, and safety compliance. Once acceptance is passed, formal production can commence.
Operational Stability Acceptance: The robotic arm was run continuously for 1-2 hours to check for smooth three-axis operation without abnormal noise, secure gripping mechanism, and no issues such as parts falling off or air leaks. The servo motors and controllers were checked for overheating to ensure long-term operational stability.
Process Adaptability Acceptance: Small-batch trial production was conducted based on the actual home appliance injection molding process to verify whether the robotic arm's material handling efficiency and positioning accuracy met production line requirements, and whether the molding cycle met expectations. If process parameters needed adjustment, they could be quickly modified via the controller to adapt to the production needs of different home appliance components.
Safety Compliance Acceptance: Check whether the robot's safety markings, emergency stop devices, and interlocking functions comply with EN ISO 10218-1 standards and Italian industrial safety regulations to ensure operator safety during equipment operation and prevent accidents.
V. Quick Solutions to Common Installation Problems: Adapting to the Quick Repair Needs of Home Appliance Factories and Reducing Production Line Downtime
During installation, common problems may arise such as the robot failing to return to its origin, the injection molding machine failing to lock the mold, and the controller not displaying anything. Based on the product characteristics of the ZHIYI three-axis robot and the quick repair needs of Italian home appliance factories, quick solutions have been developed to ensure a smooth installation process.
Robot Failing to Return to Origin: Check whether the photoelectric sensor is working properly in standby mode. Check whether the origin parameters in the controller are set correctly. If the parameters are incorrect, recalibrate the origin parameters. If the photoelectric sensor is damaged, replace it with the same model immediately.
Robot Failing to Return to Origin Injection Molding Machine Not Locking Mold
First, confirm that the injection molding machine motor is running and the pressure gauge is outputting normally. Then, check if the locking signal between the robotic arm and the injection molding machine is properly connected. Activate the robotic arm function inside the injection molding machine, ensuring the robotic arm can return to its original standby position, and that the signal cable is plugged into the correct interface. If the signal is normal, check the locking signal cable for damage and repair or replace it if necessary.
Hand Controller No Display / Unable to Set Parameters
If the hand controller has no display, check if the internal IC and display screen wiring have poor contact. If it's a wiring problem, reconnect the connector. If the display screen is damaged, replace it immediately. If the hand controller cannot set parameters, confirm that the set parameters do not exceed the limits (e.g., horizontal limit parameter 1300, placement parameter should not exceed 1300). If the IC chip is aging, replace it immediately.
The robotic arm is making abnormal noises during operation.
Check the lubrication of the guide rails and ball screw. If lubrication is insufficient, add ZHIYI special grease.
Check the parallelism of the support base. If the error exceeds the standard, adjust it using stainless steel shims to ensure that the parallelism error is ≤0.02mm/m.
VI. Post-Installation Basic Maintenance: Extending Equipment Lifespan and Ensuring Continuous Operation of the Home Appliance Production Line
After installation and commissioning, performing basic daily maintenance can effectively extend the lifespan of the ZHIYI three-axis servo robot, reduce equipment failures, and ensure continuous production on the Italian home appliance factory's injection molding line. Key maintenance points are as follows:
Regularly clean the robot's guide rails, ball screws, and gripping mechanism to remove dust and plastic debris. Increase cleaning frequency if operating in a dusty environment.Add specialized grease to the guide rails and ball screws every 500 hours of operation to ensure the lubrication performance of transmission components.
Regularly check the connections of cables and air hoses, and promptly replace aged or damaged cables and air hoses to avoid problems such as air leaks and signal interruptions.
Regularly calibrate the robot's positioning accuracy and optimize controller parameters in a timely manner according to the adjustment requirements of the home appliance injection molding process.
Website:https://www.zhiyirobotics.com/
Email:sales@zhiyirobotics.com
#Installation of Three-Axis Servo Robot for Injection Molding Machines #Installation of Robots in Italian Home Appliance Factories #Quick Installation of Three-Axis Servo Robots, ZHIYI Three-Axis Robot Installation #Installation Specifications for Three-Axis Robots in Home Appliance Injection Molding, CE Certified Three-Axis Robot Installation Steps #Installation Adaptation of Injection Molding Machine Robots to Home Appliance Production Lines #Solution to Common Problems in Three-Axis Servo Robot Installation